There’s a simple way to create aliases in a SSH config file. This way you can connect way easier to different hosts, combined with this blog post to use keys to log in.
Where you used to use this connect string:
SSH is one of the most friendly deamons in the Linux toolbox, you can port forward your home server, you can surf the internet via your own proxy server, you can transfer files, it’s the first thing I set up on a freshly installed box and by far the most used service around my home (yeah, that’s nerdy) 🙂
This post will outline how you can create a public and private RSA key pair, and then we will use that key pair to authenticate ourselves to another computer in the network.
We will need to complete the following steps:
Create a public/private rsa key pair
Copy the public key to the remote host via ssh-copy-id
Login to the remote system without a password
Create a public/private rsa key pair
If you haven’t created a rsa key pair yet, we can create it with this command:
ssh-keygen
As shown in this screenshot: If you have previously created a key pair, you will be asked to replace this.
For my home machines I don’t use a passphrase, if you’re more paranoid (or careful) you can do so. Please read this article for more info on passphrases and how to use them.
The keys have been generated in /home/yourloginname/.ssh and are called id_rsa and id_rsa.pub.
Never, never send someone your private (id_rsa) key! That is the same as handing over your house keys..
Copy the public key to the remote host via ssh-copy-id
This step should be repeated for all hosts to which you want to SSH with the newly created RSA key pair.
The command used is:
ssh-copy-id -i ~/.ssh/id_rsa joris@192.168.0.10
You will need to enter your password one last time, after that your public key is added to the authorized_keys file, which is automatically created on the target system.
After this step you don’t need to use a password any more!
Login to the remote system without a password
Just SSH into the remote system:
And wonder what you’re gonna do with all that extra time you’ve just won because entering passwords belongs to the past… 🙂
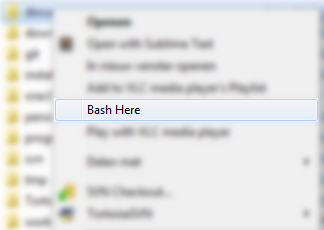
I wanted to add a “Bash Here” context entry when I right click on a directory:
This Bash Here would open that directory in Cygwin (mintty).
My current PC is fairly regulated, so without admin rights and thus I can’t use the CHere option which I would normally use.
I just created the registry keys via regedit and that works fine.
You can use two options:
Import the registry file mentioned below
Create the keys yourself
1. Import the registry file
Create a file called cygwin_bash_here.reg with the following contents:
Windows Registry Editor Version 5.00
[HKEY_CURRENT_USER\Software\Classes\Directory]
[HKEY_CURRENT_USER\Software\Classes\Directory\shell]
[HKEY_CURRENT_USER\Software\Classes\Directory\shell\bashhere]
@="Bash Here"
[HKEY_CURRENT_USER\Software\Classes\Directory\shell\bashhere\command]
@="C:\\cygwin\\bin\\mintty.exe"
Save the file and double click on it to import it to the registry.
2. Create the keys yourself
Open the registry editor: Start – Run – “regedit”
Open the following path: HKEY_CURRENT_USER\Software\Classes
Create key: “Directory”
Inside Directory, create key: “shell”
Inside shell, create key: “bashhere”
Inside bashhere double click on the standard key and insert text “Bash here” without quotes (This is the text which is displayed in the context menu.
Inside bashhere, create key: “command”
Inside command, double click on the standard key and insert text “C:\cygwin\bin\mintty.exe” without quotes. Important: This is the command which is run. Please change directory to your cygwin directory
Conclusion
Both options will create a context menu item which opens Cygwin at your current windows directory!
This message occurs every time you start your freshly installed Cygwin when you’re logged in as a domain user.
Your group is currently "mkpasswd". This indicates that your
gid is not in /etc/group and your uid is not in /etc/passwd.
The /etc/passwd (and possibly /etc/group) files should be rebuilt.
See the man pages for mkpasswd and mkgroup then, for example, run
mkpasswd -l [-d] >> /etc/passwd
mkgroup -l [-d] >> /etc/group
Note that the -d switch is necessary for domain users.
Important: You need to install Cygwin with the user you are logged in with.
Tip: Remove the word “setup” from the cygwin executable to be able to install it without administrator privileges. (e.g. setup-x64.exe should be renamed to cygwin-x64.exe)
mkpasswd -l only shows my local users, and not the domain user I’m logged in with, so that does not solve this.
mkpasswd -l -d get an enormous amount of users because it tries to replicate my whole organisation, which is not necessary.
We just need our current user ( mkpasswd -c ) to be sent to the /etc/passwd and /etc/group files, to do this, we use this command:
I wanted to SSH into my home server from my workplace but I couldn’t reach it directly because of the way the network was set up.
As it turns out it is quite easy to do by using the corkscrew program.
Edit ~/.ssh/config and add the following lines:
Host home joris.his.homeserver.com
Hostname joris.his.homeserver.com
User joris
ProxyCommand corkscrew proxyserveraddress proxyserverport %h %p
The most important part is the ProxyCommand, this lets your ssh client know that it should use corkscrew as a proxy to your host. %h means the host of your remote server, %p means the port of your remote server.
I ran into this issue today on my command line SVN client.
Every time I ran the SVN command against my repository, it asks for my password. It does remember the username but doesn’t store the password.
There are a couple of settings to check in two different files:
.subversion/config
.subversion/servers
.subversion/config
The config file contains a setting which sets the password store you will be using. We need to disable all password stores and use an empty list, which is done by uncommenting (or adding) the next line
password-stores =
.subversion/servers
The servers file contains settings which allow you to save your passwords in general and to save the passwords in plaintext (please be careful when choosing this option!)
This file is divided in sections which are set with the [] brackets. In the [global] group you should uncomment (or add) the following lines:
I encountered the following exception when trying to start our AdminServer today:
<May 30, 2013 1:04:27 PM CEST> <Critical> <WebLogicServer> <BEA-000386> <Server subsystem failed. Reason: java.lang.NumberFormatException: null
java.lang.NumberFormatException: null
at java.lang.Integer.parseInt(Integer.java:454)
at java.lang.Integer.parseInt(Integer.java:527)
at weblogic.ldap.EmbeddedLDAP.validateVDEDirectories(EmbeddedLDAP.java:1104)
at weblogic.ldap.EmbeddedLDAP.start(EmbeddedLDAP.java:242)
at weblogic.t3.srvr.SubsystemRequest.run(SubsystemRequest.java:64)
Truncated. see log file for complete stacktrace
>
<May 30, 2013 1:04:27 PM CEST> <Notice> <WebLogicServer> <BEA-000365> <Server state changed to FAILED>
<May 30, 2013 1:04:27 PM CEST> <Error> <WebLogicServer> <BEA-000383> <A critical service failed. The server will shut itself down>
<May 30, 2013 1:04:27 PM CEST> <Notice> <WebLogicServer> <BEA-000365> <Server state changed to FORCE_SHUTTING_DOWN>
This does not really explain what went wrong, but the solution is to remove the replicas.prop file and restart the AdminServer again.
The replicas.prop file is located at : $DOMAIN/servers/AdminServer/data/ldap/conf/replicas.prop
Rename (move) replicas.prop to replicas.prop.bak and retry the startWeblogic. In my case this solved the not starting server.
"\e[A": history-search-backward
"\e[B": history-search-forward
set show-all-if-ambiguous on
set completion-ignore-case on
This allows you to search through your history using the up and down arrows … i.e. type “cd /” and press the up arrow and you’ll search through everything in your history that starts with “cd /”.
It’s quite handy to indent XML when you need to read it with the human eye, but on a terminal it’s often not as easily readible.
Fortunatly there’s a command which’ll indent it so you can actually read it;
xmllint –format file.xml This will show you how ugly it could be:
Screenshot Unformatted XML on terminal
And behold the indented beauty of this little gem: Screenshot indented XML on terminal
Okay, so this might be a tad geeky, but I dislike overhead when I’m working on my work laptop.. And since I couldn’t find a streaming music player with a low memory footprint I loved this mplayer solution which can play your internet streams via a bash terminal.
Apt-get install mplayer or mplayer2 and then just execute this command in any terminal
mplayer http://pr320.pinguinradio.nl:80/
Which will result in the following: Screenshot Mplayer in Terminal on Ubuntu
And it will update the stream title through the console so you can still see which artist and song are playing! A thing of beauty, isn’t it!?