I’ve recently made the transition from Firefox to Chrome as my main browser. Unfortunatly there still isn’t an alternative on Google Chrome for the Live Bookmark functionality which I used on Firefox, and this might not come soon according to these sources:
RSS Live Bookmarks @ Google Support forums
I did found this link, the extension was a bit too buggy for me (but maybe you’ll be fine)
Chrome Web Store – Live Bookmarks
While trying several extentions I did not find one which offers the same functionality as the Live Bookmarks on Firefox, only RSS readers which wouldn’t work as intended.
My use for these rss feeds is to point to servers and/or environments. So it’s more used as a dynamic bookmark than as a RSS reader. The bookmarks are placed on a local server at my company so our operations department only has to update 1 resource when there are updates.
The end result isn’t exactly the same as the live bookmark in Firefox but to me it’s a pretty good alternative:

Instructions:
First we’ll show you the XML which is used for this RSS feed:
<?xml version="1.0" encoding="utf-8"?>
<rss version="2.0"
 xmlns:atom="http://www.w3.org/2005/Atom"
 xmlns:dc="http://purl.org/dc/elements/1.1/">
 <channel>
 <title>jorisvisscher.wordpress.com Example RSS Feed</title>
 <link>http://localhost/links/example.xml</link>
 <description>Example RSS Feed for showing XSLT transformation</description>
 <atom:link href="http://localhost/links/example.xml" rel="self" type="application/rss+xml" />
 <item>
 <title>====== First Category ======</title>
 <link>http://google.com</link>
 </item>
 <item>
 <title>Local ALSB Server</title>
 <link>http://localhost:7001/console</link>
 </item>
 <item>
 <title>Local WLS Server</title>
 <link>http://localhost:7002/console</link>
 </item>
 <item>
 <title>Local BPM Workspace</title>
 <link>http://localhost:8585/workspace</link>
 </item>
 <item>
 <title>====== Second Category ======</title>
 <link>http://google.com</link>
 </item>
 <item>
 <title>Link to another server</title>
 <link>http://notlocalhost:7001:sbconsole</link>
 </item>
 <item>
 <title>Link to yet another server</title>
 <link>http://notlocahost:7001/console</link>
 </item>
 </channel>
</rss>
Previously on Firefox this feed would look like this:

Without a XSLT transformation, this RSS feed would look like this when opened in Google Chrome:

This ofcourse isn’t useful since we can’t click on the links. To fix this, we’ll add the following line to the XML file:
<?xml-stylesheet href="rss.xsl" type="text/xsl" media="screen"?>
The RSS Feed would look then like this:
<?xml version="1.0" encoding="utf-8"?>
<?xml-stylesheet href="rss.xsl" type="text/xsl" media="screen"?>
<rss version="2.0"
 xmlns:atom="http://www.w3.org/2005/Atom"
 xmlns:dc="http://purl.org/dc/elements/1.1/">
 <channel>
 <title>jorisvisscher.wordpress.com Example RSS Feed</title>
 <link>http://localhost/links/example.xml</link>
 <description>Example RSS Feed for showing XSLT transformation</description>
 <atom:link href="http://localhost/links/example.xml" rel="self" type="application/rss+xml" />
 <item>
 <title>====== First Category ======</title>
 <link>http://google.com</link>
 </item>
 <item>
 <title>Local ALSB Server</title>
 <link>http://localhost:7001/console</link>
 </item>
 <item>
 <title>Local WLS Server</title>
 <link>http://localhost:7002/console</link>
 </item>
 <item>
 <title>Local BPM Workspace</title>
 <link>http://localhost:8585/workspace</link>
 </item>
 <item>
 <title>====== Second Category ======</title>
 <link>http://google.com</link>
 </item>
 <item>
 <title>Link to another server</title>
 <link>http://notlocalhost:7001:sbconsole</link>
 </item>
 <item>
 <title>Link to yet another server</title>
 <link>http://notlocahost:7001/console</link>
 </item>
 </channel>
</rss>
As you can see, we are pointing to a xslt file to transform our RSS feed for use on the screen (or any other XML file for that matter). Place the XSLT file in the same directory as the RSS feed, or adjust the locator to the correct URL.
This is the XSLT file which we’ll use:
<?xml version="1.0"?>
<xsl:stylesheet version="1.0" xmlns:xsl="http://www.w3.org/1999/XSL/Transform" xmlns:wfw="http://wellformedweb.org/CommentAPI/">
 <xsl:output method="html"/>
 <xsl:template match="/">
 <xsl:apply-templates select="/rss/channel"/>
 </xsl:template>
 <xsl:template match="/rss/channel">
 <div>
 <h3><xsl:value-of select="title"/></h3>
 <p><xsl:value-of select="description"/></p>
 </div>
 <div>
 <xsl:apply-templates select="item"/>
 </div>
 </xsl:template>
 <xsl:template match="/rss/channel/item">
 <div>
 <a href="{link}" rel="bookmark"><xsl:value-of select="title"/></a>
 <xsl:value-of select="description"/>
 </div>
 </xsl:template>
</xsl:stylesheet>
Please note; It’s pretty basic, I didn’t do much formatting since I’m not that much of a CSS guru 🙂
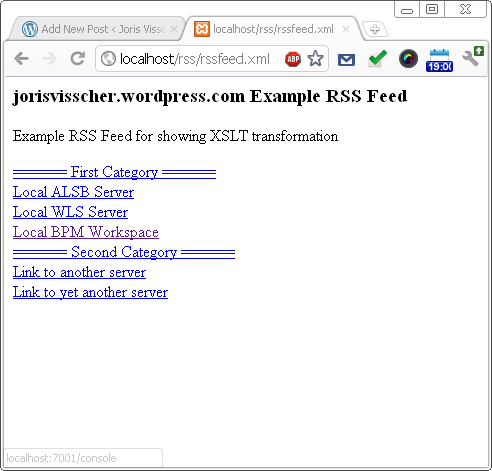
When opened in Google Chrome, it will look like this:

Which is completely usable for me, since I don’t need Firefox anymore for my live bookmarks.
Happy bookmarking!


